Tuesday, 29 October 2013

The Starting Off Project Week 10 : Tools


I can't quite believe it's already the end of #thesoproject, I've got to admit that I'm pretty sad about it to be honest. I've loved writing about my own little tips and tricks, especially as I didn't realise what they were until I had a good think about them! I've got to say a massive massive thanks to Steph from Stephs Inside Voice for organising the whole thing too, she's been amazing and so organised, I do not know how she does it! When I started the starting off project I'd only been blogging for a few weeks and was still feeling really overwhelmed, but through the project I've really felt a part of the blogging world. Plus, knowing what to blog about at least once a week with my recent hectic uni life is really nice!

Anyway, on to the informationy-type bit....


When I started to think about tools this week I realised I'm a big brush-a-holic, I have bought so many and justified them for all sorts of reasons it's a bit insane! I did manage to narrow my essential beauty tools down though, as I realised that really, you dont NEED that many. Here's my top 5....

Blush/Bronzer Brush- Because c'mon, you aren't gonna attempt that with your fingers are you?
A flat eyshadow brush- For packing on the colour onto the lid, any flat dense brush will help you get the most out of any shadow and up the pigmentation.
A blendy brush- This one's Mac, but certainly doesn't need to be. Essential for blurring edges of eyeshadow without adding more colour and making sultry smokey eyes!
Tweezers- Even the bushiest brows need a little tweaking and tidying every now and again.
Eyelash Curlers- Not strictly essential, but even the cheapest pair makes such a difference. A nice curl and any cheap mascara can look amazing!


Also I want to give a little nod to a buffing brush for foundation, although I didn't want to include it as I have waffled about it sooooo many times, and also, foundation with your fingers can be fab too! If you really wanted to narrow tools down to the bare necessities, you could get away with only a bronzer brush and blendy eye brush, applying shadows with your finger, and leave your eyelashes and brows to do their own thing. However, if you are looking to dabble in tools for the first time, but don't fancy taking out a loan to buy the entire mac collection, any good quality (and note non branded) brushes and tools will do a great job!I think these five products would be a great place to start. And, at the risk of sounding like the blogging world's broken record here, a special mention to the purse-friendly-luxury-quality Real Techniques must be made.


Lots of love lovelies, and I hope you've liked this and all my #thesoproject posts! I'll be sad to see them go....


Thursday, 24 October 2013

Lustlist #4


I don't know what it is about uni, but the more I work and get stressed out, the bigger my urge to shop! Spending money is the way I relax, ahhh I just love it! I've started to think about Christmas as people have started asking what I want, here's a few ideas I've been having whilst researching my essays internet shopping....

A tartan scarf- I'm on the shelf on this one after seeing so many people wearing them. To buy or not to buy.
Purple short Hunter wellies- I love these! I live in my short black ones in winter and it's about time I added a big of colour to my shoe wardrobe.
YSL Mascara- A few of the house girls use this and say its amazing... but it's not the cheapest and I'm really picky about mascaras, it's such a personal thing.
Stila All Day Liquid Lipstick- The amount of times I've swatched these then put them down is insane. I just can't decide what colour to pick, plus I'm waiting on the new Topshop Velvet Lips too. Buying at least 5 when I finally crack is inevitable though.
Vivienne Westwood Earrings- These are top of my christmas list. Please, Santa, pleaseeeeeeeee.
Marc Jacobs Natasha Bag- Gorgeous. Do I need to say more?


Happy Lusting lovelies,


Tuesday, 22 October 2013

The Starting Off Project Week 9 : Lips!


Ah lips. Lipgloss and lipsticks are probably something that beginners or stick-to-what-you-know-ers fear most. I have so many friends who say I'd love to wear a bright lipstick like you but can't, and I'm here to say yes you can!
If you're scared of colour, build up gradually or try lip tints for a less dramatic look, and if you're worried about being messy, practice makes perfect! And also, a lip tint or gloss applies much easier than stick. When buying a lip product, things can get a bit confusing as there are so many products on the market, so this week I thought #thesoproject could do to explain these types to you guys as best I can! Here goes...

The Balm-
Not really a lipstick or gloss as such, but essential for dry lips. Use these overnight or to give a subtle glossy look, just don't use too much or you'll end up with drier lips than you started with! Plus, they give a nice base if applied sparingly underneath dry lipsticks.

The Lipstick- 
This is the obvious one, and I know I sound like an old record here but the best thing to do is try! Don't be afraid to ask to try them on in store and then say no, and don't be scared of bright colours, a red lip is classic and gorgeous. If you're worried about messiness, use a lipliner first, and practice that steady hand!

Gloss-
Not something I'm a huge fan of, not because of the look but because my hair always manages to get stuck in it. However, if it's not windy or I'm rocking an up-do, a little glossy with a sultry eye can look amazing but understated.

Coloured Gloss-
A gloss I do love however which is not sticky is Rimmel Apocalip's , more like a lipstick in colour and gloss in texture, picking up one of these adds a little versatility to your makeup bag.

Lip tint stick-
What can I say about the popularity of these, they are everywhere! No matter what brand you buy, these are probably the easiest way to add colour to lips without fearing it'll all go wrong. They add a subtle hint of colour that can be built up to super-strong colour with layering, add there's so many types out there now there'll be a colour for you whether you're a bold gal or a more neutral lady!

Lip Pens- 
Feel like permanent markers, apply like permanent lipstick, I love these things! Have the finish of a matte tint usually, and are super easy for the less delicate handed of us! I'd really recommend trying these if you haven't already!

Lip Crayon-
Also an easier variation of lipstick as they're so much easier to get where you want them and achieve a good lip shape, plus if you're looking for the best matte's pencils are usually where you'll find them.


And breathe! I hope you got all that, I tried to keep it as short as possible as there's so many lip products out there! If you're new to lip products go for tints and balms first then work your way up into trickier products, and just remember ANYONE can go bold!
Lot of love,

Sunday, 20 October 2013

Nail Inc New Gel Effect Nails!


(Left- One Coat, Right- Two Coats, No top coat on either!)

Last week I was browsing the nails inc stand (again!) at debenhams when the lovely assistant asked if I would like to try one of the new Gel Effect nail polishes. Of course I said yes, and was very pleasantly surprised when she painted all of my nails for me (this usually costs around £17 I think!). I first chose the Porchester Square shade, which is a lovely grey-ish nude and a cult classic in its natural form, but was eyeing up lots of shades while I was sat there and ended up with this gorgeous wine shade (called Kensington High Street) on my ring fingers as an accent. I've got to say I don't often purchase Nails Inc because I find them so easy to chip for the price, but I still buy one once in a while because I love the colours and effects, especially if they are on offer. Plus, I rarely wear the same nail colour for more than two days so chipping isn't a major problem. However, I haven't had this problem with these Gel Effects. I kept my newly painted nails the same colour for five days with these and saw no difference in the quality, before I gave in to temptation and went for a new shade. 

Onto to colour- you can see how pigmented this one is the photo's above, even after one coat it's wearable but you don't quite get the full deep colour and shiny finish. I must stress that I DID NOT use a topcoat in these pictures- that's just how glossy they are and I love it! It doesn't come across on camera as well but I found that these really did look like a gel manicure, and to add proof a couple of people at work thought I had had shellac nails on! As much as I love Barry M Gelly Nail Polishes, you can't beat Nails Inc at nail effects and these do put the Barry M offerings to shame slightly (that doesn't mean I don't still love you though Barry). 

At £14, they aren't cheap, so I only picked the wine shade as I have lots of nudes and vowed not to buy another berry colour this autumn (pfft that might happen). I'm really lusting after Porchester Square now but I'm sure I have it somewhere in its regular finish. However, they do sell these on a range of websites, so shop around and look out for offers, especially Beauty Bay which is fab for Nails Inc offers!

If you're a fan of the gel manicure but can't keep forking out for one, these could be your answer, especially if you're a one shade kinda girl!

Lots of Love Beauties,


Tuesday, 15 October 2013

The Starting Off Project Week 8: Eyeshadow


Ooooh it's eyeshadow week. This is one I've been looking forward to for agessss, but now I've come to it, I'm actually  not too sure what to write. I've been playing around and experimenting with eyeshadow for years, and unlike products for the complexion I think eyeshadow is a part of makeup that is really personal to you - you know what you like and what suits you after a while. So many times has someone else done my eyes and had me running for a makeup wipe! So really my biggest tip is try, but here's also a few more tips and tricks I can share from my own relationship with eyeshadow....


There are two types (I couldn't think of any more) - cream (above), and powder (below). Creams really aren't as daunting as they look, and for beginners I think they're actually quite fab, just a little on your finger blended into the lid can be a very simple way of working eyes into your makeup routine. Secondly good ol' powder- better for creating more complex smoky eyes if you're feeling daring. Although I'm no argueee of the 'high end is better than drugstore' debate, I sit firmly on the side of the drugstore, be careful when buying cheap powders and always swatch first! If the pigmentation is rubbish, I would tend to stay away, as no matter how gifted you are with that blendy brush it ain't gonna look great. For cheap and really good quality colours, and a wide wide range, look towards Bourjois -their little pots have never let me down!


I would also say stick neutral! Although I like to pop out a blue or purple eye once in a blue moon, stick with nice neutrals like the ones in the pictures to make this easy for yourself. Unless you're a makeup fiend like me there's no need to purchase a naked palette (or all three, oops), but a nice matte light beigey shade for the lid area and a brown one for the crease and you have all you need for a range of looks, pick up a black and youve get everything to create a sultry, sexy, smokey look.

In terms of brushes, there's really only two you need, and although I love my Mac 217, a flat brush like this green forever 21 one (right) and a big fluffy blender like this Real Techniques one (left) will be absolutely fine! I still reach for these almost daily even alongside my more expensive ones. On the topic of blending, here is perhaps the most important tip - BLEND! Never leave a line around the end and never colour right up to eyebrows (I'm saying never as I never could although you might suit this look, I really don't), just make sure to blend it all in so you don't end up feeling like a clown!


And just experiment beauties! My eye looks change all the time!
Lots of Love,


Friday, 11 October 2013

Testing, testing.... Having your eyebrows waxed by the Benebabes...


So yesterday I went for my eyebrows waxed by the lovely girls at Benefit in Boots Leeds Trinity. I don't usually pay for treatments like this (eg. eyebrows, tanning, nails etc.) but after being convinced to buy a couple of the very few items I don't have from the range I was gifted a free brow wax! First of all the lady serving me (I can't remember her name or even if she told me it actually), sat me down and 'mapped' my brows which basically meant she showed me with a stick what she would do, although I must say she said mine were in pretty good shape (proud moment, woo!). Next she heated up a pot of wax and applied it around my eyebrows before pulling off, ouch! Boy did it hurt, especially underneath the brow so close to my eyelid. It only hurt for a second, but afterwards I felt like my eyebrows were absolutely huge, and they were very, very, very red! I had refused a tint which they tried to sell me as I'd already spent a considerable amount on products and I usually do it myself with one of those eyelure boxes. Also, you have to sign a release form saying you can't sue Benefit if something goes wrong, which is slightly worrying, but don't worry, nothing went wrong with me.

The results are fab! Once the redness had died down you could really see the shape of them being much more defined - no pesky small hairs or random ones shooting off in different directions. And still thick-ish lovely brows, yay! Apologies for no before and after photos, I completely forgot, but just have a nosy at my brows on instagram to see the results...
I must say if I was to have my brows waxed again, I'd probably go to one of the other Benefit services in Leeds as with it being in Boots (a drugstore), it just wasn't the calm and luxury experience I wanted it to be, with hundreds of shoppers weaving in and out past us all the time. Plus, it would be a bit steep if it wasn't free, another thing to keep in mind. Maybe I'll take waxing up occasionally, but I certainly couldn't afford a wax and tint for £18.00 every 4 weeks as was suggested!

All in all, I'd really recommend eyebrow waxing (or any other facial waxing) as the results are fab and I didn't think I had enough brows to wax! You could try Benefit, or if you try another service, particularly in Leeds, please do let me know! Here's a pic of the price list in case you were wondering, as it doesn't seem available online, but just be warned I don't know if this list is Benefit-wide or just for the Leeds store.


Have a fab weekend beauties,


Tuesday, 8 October 2013

The Starting Off Project Week 7: Eyeliner!


Good evening beauties, hope you've all had a great start to the week! This week on #thesoproject, we're talking eyeliner, and for this one I thought I'd give a little run-down of the different types of eyeliner and how to use them as unless you are an avid eyeliner lover like me, you've probably got one type that you stick to. Lets begin!...


The Liquid
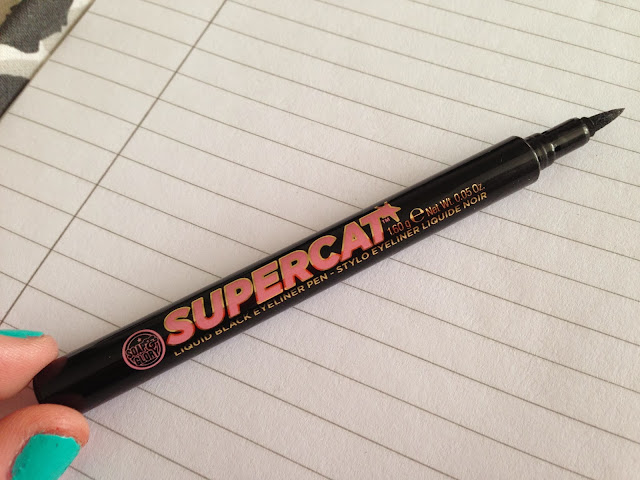
Liquid eyeliner I always think is something people love, but have difficulty using as it can get pretty messy! Instead of the traditional ones with a pen you dip into a pot, I go for the pen varieties (such as this Soap and Glory one) as I find them much easier to work with. Liquid eyeliner should be used to create defined lines such as a feline flick or just a simple upper lash lining. Dotted in between lashes subtly can create a very natural but full eyelash look too. This one shouldn't really be used to try a create a smoky eye, although if you have achieved one with this let me know! Beginners I would definitely recommend you try a pen style liquid eyeliner, as it might not be as tricky as you would expect!


The Kohl
A classic and my personal favourite. The Kohl is the multi-tasker of the group. Use it in a similar way to the liquid to create defined lines or even go a bit adventurous (it is almost Halloween) but just keep it sharp to avoid smudginess. More importantly though, this baby will give you that smokey eye you've been dreaming of. A little smudged half way across the lower lashes is perfect for subtle day time glamour or can be really built up on the night for sultry, sexy, makeup. Mostly I stick to brown and black, although blues, khakis, greys and purples also look gorgeous without being too in-ya-face! Try these bargain Topshop ones at £4, or even just a 99p one from a beauty store works fab!


The Eyeshadow
Not what you expected? Well just like kohl a black eyeshadow can be perfect for a more sultry eye look. Used with a skinny brush like this one, or even your finger or a cotton bud, can really smoke up an eye look. This is especially useful if you want to experiment with colour, or be more subtle than drawing on a line of eyeliner. I like to use it on my upper lashes if I'm rocking a smoky eye as it blend into shadow better than eyeliner but still looks as dark! Any eyeshadow of your choice is fine, this one is by Bourjois.


The Gel
A relatively new addition to the eyeliner world, but one that I must say is not as scary as it may look. Performs similarly to the liquid eyeliner, but its more gelly forumla can be used to create dark dark dark smudginess too if you're quick. The thing I like best about gel is that once set, it will not budge! Used with an angled brush its super easy to create flicks too, trust me! There are lots out there on the market now, but one that I love and a lot of other blogger seem to is Maybelline's offering, which also comes with a handy brush!


That's my quick whos-who of eyeliners, so there's only one thing left to do lovelies.... get experimenting!
If you're part of #thesoproject please post your links in the comment box!
Love,


Thursday, 3 October 2013

Mac Riri Woo At Last


Finally! At last I managed to get my hands on Mac's Riri Woo Lipstick before it sold out! I got up at crazy o'clock to get to Harvey Nichols before it opened and was the first there (but not the only makeup-mad people there I must say). The whole range looked absolutely gorgeous but now I'm a student again and have to spend my money on boring things like food, urgh, I could only afford one lipstick. Some people were just asking for the whole range! I was so jealous. But, I did manage to get my mitts on this stunning matte lipstick after all this time. The retro matte look is right up my street, so I'm instantly loving this!
There are still some left online, so if you're reading now, get onto Mac here right now!! My other reccomendation would be Talk that Talk which looks so nice too, and the eyeshadow pallettes! 

I'll let the pictures do most of the talking (although I apologise my dark uni room and a rainy day means the lighting was absolutely rubbish), but I must say after swatching and trying on the way home this retro matte is just as super-pigmented as regular mac lippies, plus has that gorgeous scent that I just love! And if this doesn't sell it to you, have you seen the packaging? Its lush!! 
As a retro matte I can imagine with longer wear this could be drying, but a little balm pre-application solves this without taking away the matte finish!

Get shopping ladies!


Lots of Love,


Tuesday, 1 October 2013

The Starting Off Project Week 6: Mascara!


Hey beauties, can you believe it's week 6 of The Starting Off Project already?! I went on a little break last week as I had some major technical issues at home, plus I'm not a big blusher wearer, but this week I am definitely back with all things mascara related! Unlike blusher, mascara is something I could not live without. Seriously. The thought of leaving the house without it? Urgh. 

Because of my love of mascara I find myself testing and trying lots of different releases, and boy is there plenty. When isn't there a new formula or wand out that promises to give you bigger, fuller, longer, more beautiful lashes? And while I usually fall for hypes and try the new products, there are a few old favourites I always return to, and these are what I'm going to share.

First of all I want to also point out that I really believe that the wand, not the formula, makes a mascara, and so from time to time (and I know I'm not the only one) I've saved good wands from expensive mascaras and dipped them in the cheaper ones. Not as good results as using the original, but if you're on a budget like me, just a little tip!


 I picked my two regulars and all time favourites, the best being Maxfactor's False Lash Effect offering in the middle. I don't know how it does it, but I can't find anything that gives me better separation and volume like this baby does, and so consistently. However, I am a sort of two-mascara girl, I like to really lengthen and then bulk up with something volumising (you could volumise then lenghten but I just don't think it works the same). To lengthen I use No7's Extreme Length because it does exactly what it says on the tin! I've just realised I've photographed the same mascara twice here when in fact I was trying to get one of the purple waterproof version too. They are the same mascara, but just different packaging, although I personally find the waterproof (lets pretend it's the one on the right) performs slightly better in its longevity!

Here's a picture of the brushes below. I'm not sure how true this is, but I find the bulkier the brush, the more volume you get, so I look out for thinner brushes (on the edges) for length and bulkier ones (middle) for volume!

You'll notice that I've also included eyelash curlers in this weeks post, and that's because I never use mascara without them. Mine are Shu Uemura, but if you don't have £20 to splash out any old pair still make a huge difference. I like to pump at the bottom of lashes, right in the roots, for a few seconds, then do another shorter pump half way up, but fiddle with them to find the best results for you. The Voila! Super curly stand-out lashes will be yours!

Apart from my two favourites here, I also love the superbargainous mascara range from Natural Collection in Boots, and Maybelline's 'The Rocket Volume' for night out blackest-black lashes!

As always please send me your questions and comments or links in the comment box below, and have a brilliant week lovelies!


Design by | SweetElectric