Showing posts with label gagaaboutmakeup. Show all posts

Thursday, 8 May 2014

worth the hype? nars laguna


I recently gave in to all the hype around Nars Laguna and made a purchase, although what I make of it might not be what you're all expecting.
 First off, Nars packaging, need I say more? Beautiful and simple as always. I also really like the tone of this bronzer, not too orange (although not suitable for contouring my skin) and really subtle. But I also found this a little too subtle. I wouldn't say I had a medium skin tone but I seem too dark for this to really show up without building up a good few layers of the stuff. I much prefer a big sweep with a big ol' powder brush for a wash of colour. I still do like it, especially for pale days, maybe in Winter this will get more of a look in. But it just hasn't been love at first swipe like I expected. The formula is buttery soft, but I wanted a little more pigmentation in there which I just didn't get when I applied it to my face. Don't get me wrong I like it, but it won't be my go-to bronze this summer, especially not with the high price tag. I'll be in no hurry to repurchase. Sorry Nars, I dostill love you, but Laguna doesn't love me!

What do you think of Nars Laguna? What's your holy grail bronzer?
Charlotte xxx

Tuesday, 29 April 2014

bourjois rouge edition velvet matte liquid lipsticks


Say Bonjour to my new favourite French beauty products! These new liquid lipsticks are like lipgloss that dries to a velvet finish, very matte but not drying on the lips like typical matte liquids, more velvety, with a satin like finish. These are the most long lasting lipsticks I've tried, lasting right through dinner, brushing my teeth and a good 6 hours after that. I am amazed! The colours are really pigmented too, as you can see, but I do wish Bourjois had gone a bit more out-there with their shades, putting in a purple or more nudes, or a popping on-trend orange. Whine over, I really do love these. The one's pictured above are Peach Club, Hot Pepper and Frambourjois. Peach Club is a lovely subtle peach but still bright, for those who are a little shy when it comes to bright lips. Hot Pepper is a bright bright orange-red which is right up my street, my favourite of the bunch, and Frambourjois is a nice reddy-pink with I thought was a little more wearable than the other pink offering, Pink Pong. I can see me collecting the other shades very soon, although annoyingly I can only find 6 of the 8 shades on sale anywhere! What's with that?

If you try one thing in the next few weeks, make it these.

At £8.99 they aren't the cheapest lip offering on the high street but are quite unique and amazing quality. You can also pick them up on 3 for 2 at Boots at the moment, or Superdrug Buy One Get One Half Price. Find them here, or here.

Love,
Charlotte xxx


Saturday, 26 April 2014

the budget contour : sleek face contour kit


It seems to have been budget-central here at GAB lately, after chasing cult products and visiting Mac way too much lately I've turned my hand to a bit of bargain hunting. You've already heard about my love for new budget brand Makeup Revolution here, but I also had my first dip into Sleek products last week in a little Superdrug haul. One product that has been raved about a lot is the Sleek Face Form Palette, but it was out of stock and I'm not a big blush girl, so I went for the smaller contouring palette, at £6.49. I'm a big big fan of contouring, in fact I rarely leave the house without a little help shaping and sculpting my face. But finding a budget bronzer which is grey-toned enough to leave you looking sculpted and not selectively tangoed isn't the easiest task. Enter Sleek. 
It comes with two powders, one for sculpting under the cheekbone to create a natural shadow, and a highlighter to brighter the tops of the cheeks. The sculpting powder is a lovely grey toned brown, although this one is light and rather dark for a 'light' shade so I'm not sure super-pale beauties would have much luck with this. I'm semi-pale and its works just right for me. It's not too dark however that you can go awfully wrong, just keep a light hand in mind. It's also shimmer free creating a natural look. The highlighter is really beautiful and rather shimmery natural shade -don't be using this to contour your nose- but adds a gorgeous sheen which can be blended to a subtle finish or built up for more dramatic looks. 
I was also pleasantly surprised at the packaging- compact, smooth, and dare I say sleek? It reminds me of Nars packaging quite a lot. If I was picky I wish the highlighter was a tad smaller and sculpt powder a little bit, but for £6.49 who can complain? If you're into blushers I'd recommend picking up the full Face Form palette as at £10 its a steal too! I can see this becoming a handbag staple, much easier to carry than a bronzer and highlighter....
Buy it here.
Have you tried any Sleek products? Do you love this contour palette as much as me? I would love some recommendations to try out more from the brand!

Love Charlotte xxx

Tuesday, 22 April 2014

a new obsession


Say hello to the new brand on the street, Makeup Revolution. It only came out of the beauty woodwork last week but if you haven't heard about it yet, where on earth have you been?!

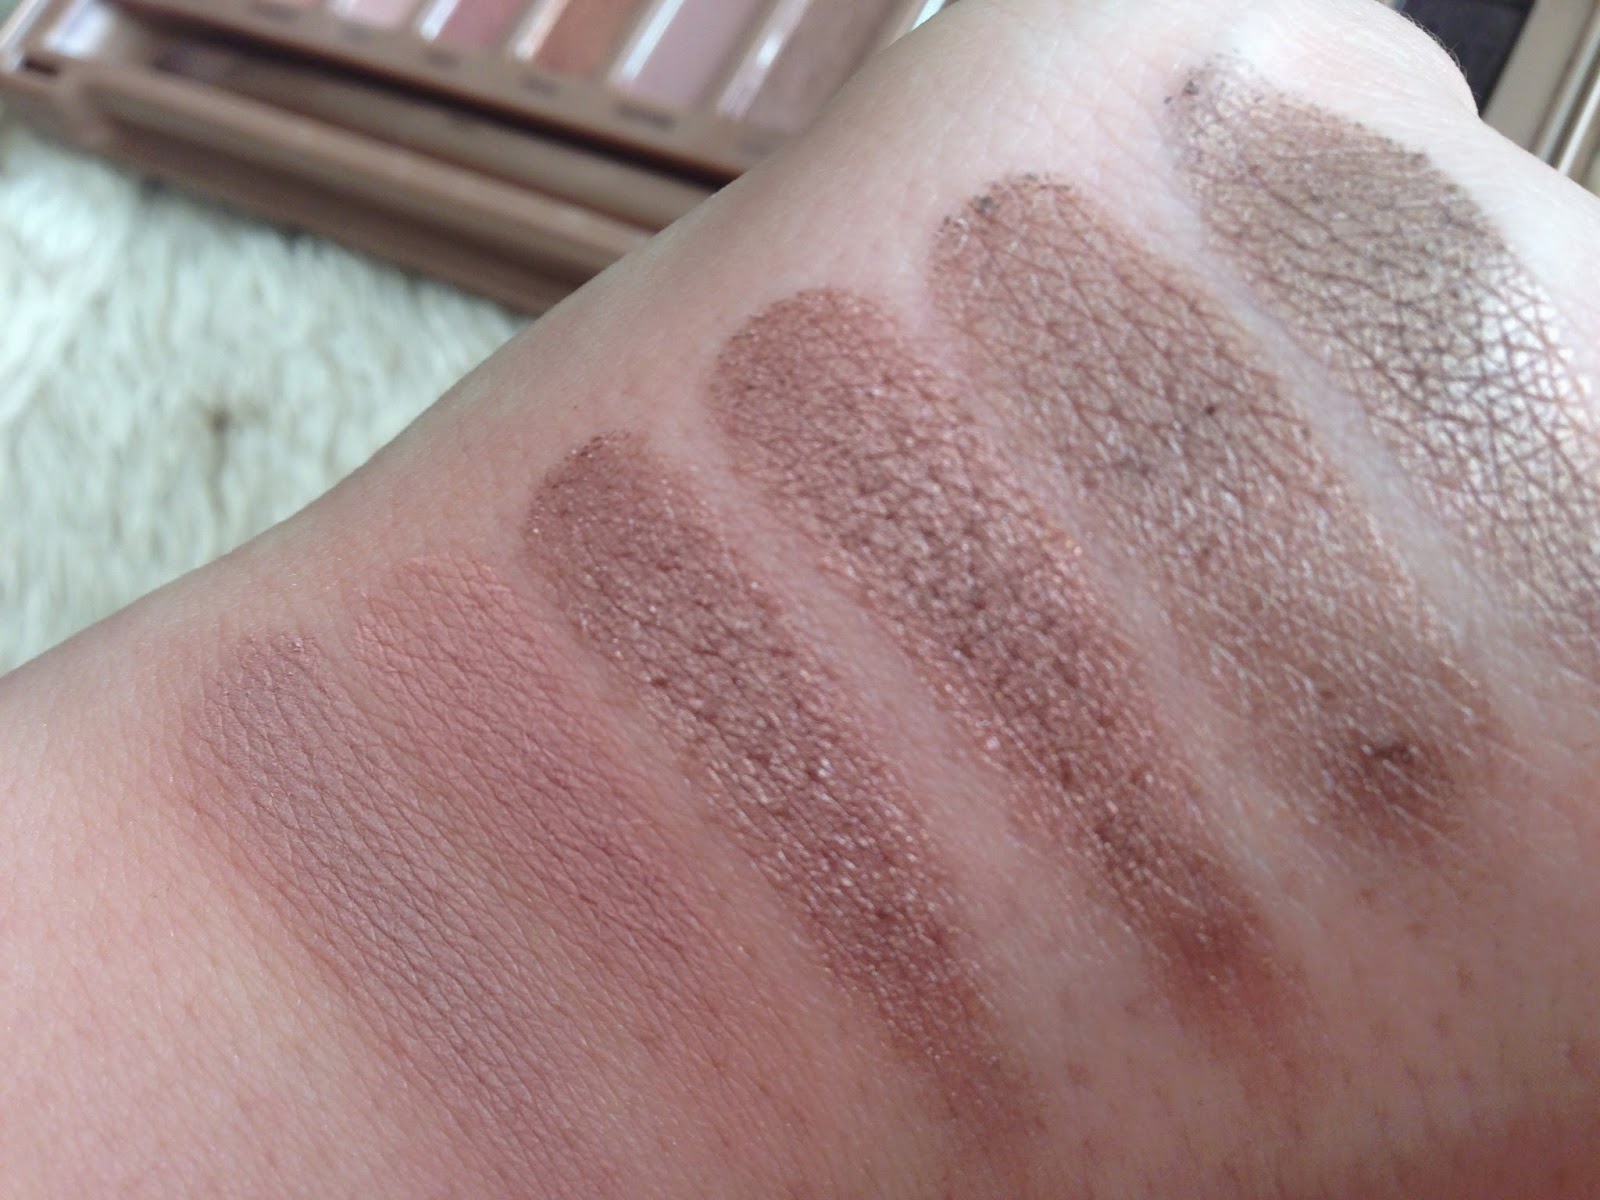
The main product the bblogging world has raved about is this, the Iconic 3 palette, a stellar dupe for Urban Decay's Naked 3. And I have to jump right on the bandwagon and tell you how amazing this is. Looking at the pictures above it is easy to see just how much of a dupe this is - colour for colour. And the colours really are pretty much the same, as you can see. You can't even tell the difference between the shimmers, and the mattes are only very very slightly different. The Makeup Revolution swatches are on the left above. The quality of course isn't quite the buttery formula of UD, but it's still really really good for an brand, never mind the £4 price tag! I also don't think the packaging is bag for such a budget brand. I'm totally in love with this product and can't wait for more from the brand, after trying this out on my eyes and seeing how well it performed I went straight back to Superdrug and ordered a whole lot more products. Seen as I already own all the Naked's, I've passed this on to my younger sister to stop her borrowing mine all the time. If you were thinking of picking up any of the Nakeds, I'd seriously consider purchasing these instead. You could have all three palettes for £12, a third of the price of just one from Urban Decay!

Available here, with free delivery over £10.

Tuesday, 11 March 2014

Giving up lipstick for Lent...


Apologies that I've been a little MIA lately but life has gotten super-hectic again, I can't wait for easter to get back to blogging all the time. For anyone who doesn't know, I've giving up lipstick for lent (buying not wearing), and in a mission to keep myself sane and actually get through the whole 40 DAYS ARGH I'm making every effort to use all my different lip products that I love and have forgotten!
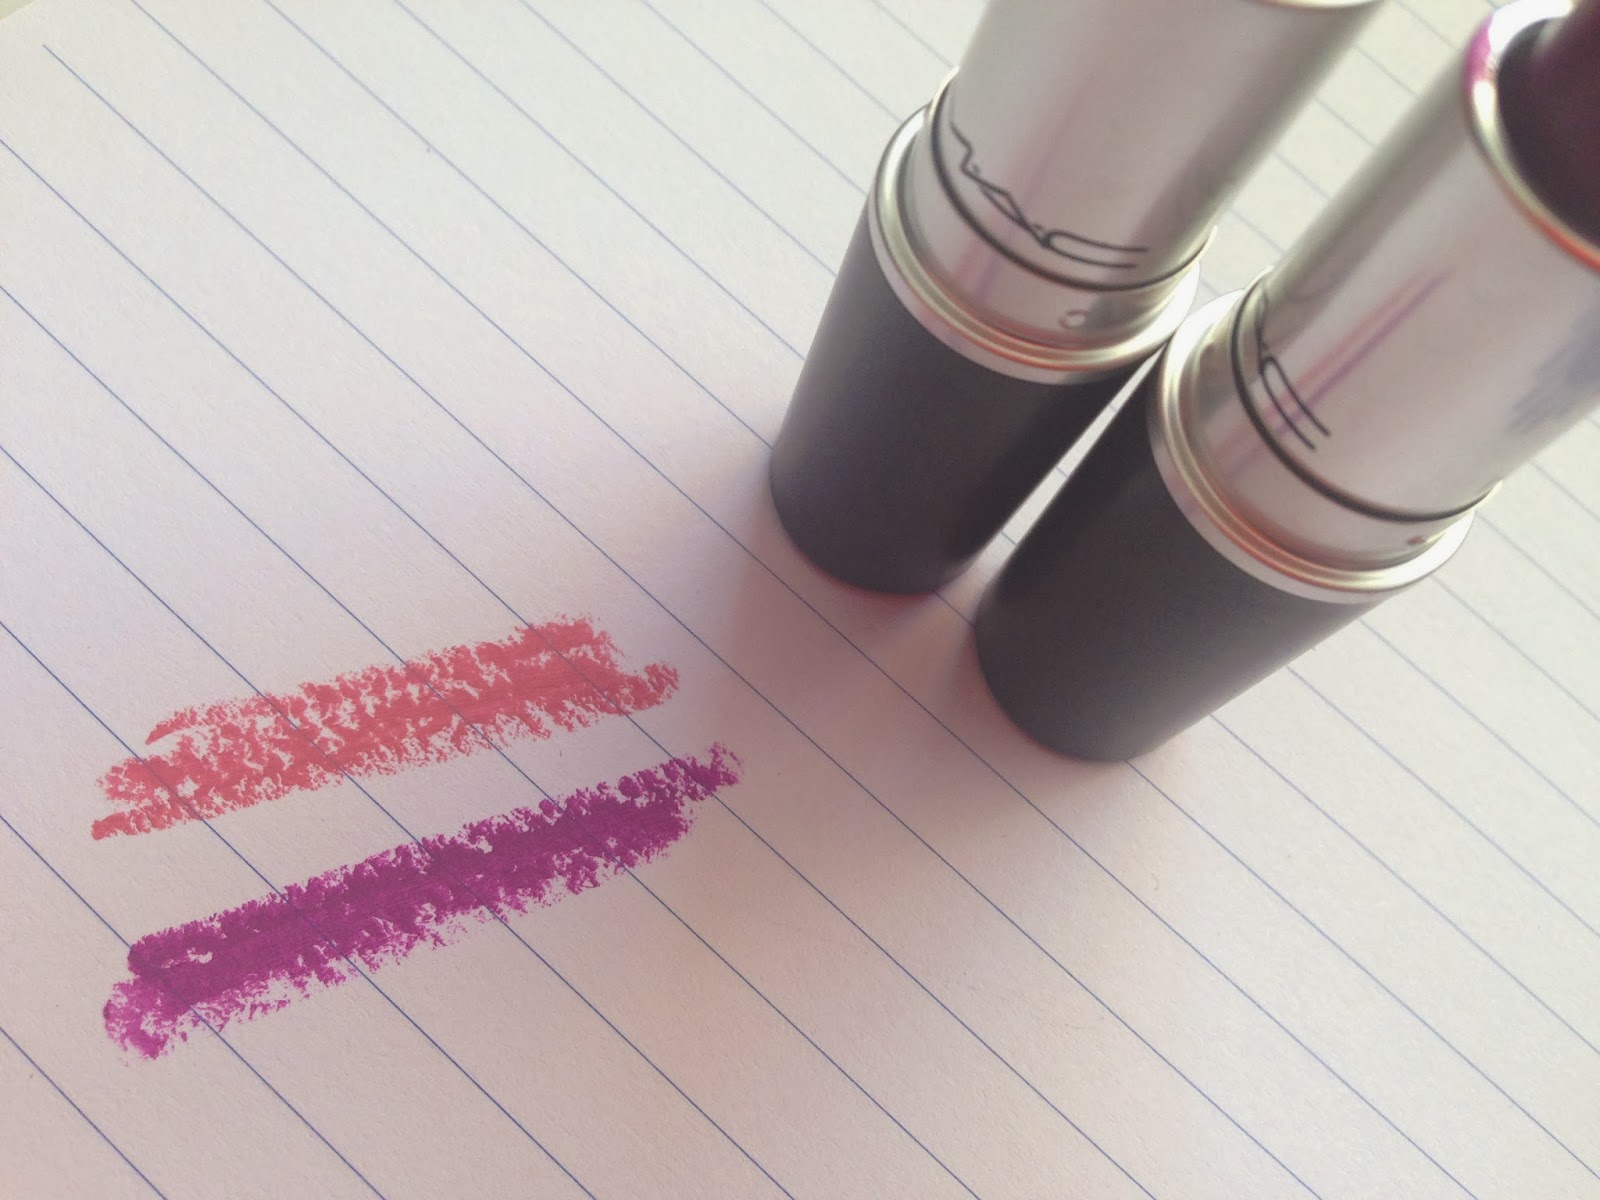
Before I gave lipstick up, I had a teeny weeny (read: huge) splurge on lipstick and these are two that I got last week. I've bought a lot of Mac lately, oops!!

Here's a nice nude/pink I've been after for a while, Pink Plaid. It can look really pink or quite nude depending on my other makeup and whether I have a tan, but it's far from bright so it's the perfect everyday shade. Second I got the newly re-released Heroine. If you follow me on instagram (charlgaga) you miiiiight have seen my purple lip craze lately and when I saw this had come back out in store I snapped it up straight away. It looks a lot scarier on the paper and in the bullet than it does on the lips, but have the bronzer ready if you want to avoid a touch of the corpse bride. Again check out my instagram to see it in real life. 

I really love these two, they are pricey at £15 but they are one of the best ranges about, especially as there's so many mattes (my fave) compared to high street brands.

Wish me luck for the rest of NoLipstickLent, and expect lots more lip updates coming soon...

Love Charlotte
xxx

Wednesday, 26 February 2014

L'Oreal True Match Review...


 (foundation is rose beige, concealer in natural beige)

I don't know why it's taken me so long to blog about this foundation as I absolutely love it! I had heard so many people compare this to the Armani Luminous Silk offering, which people raveee about but I've never had enough pennies to try out, and so this seemed like the perfect alternative to me. The foundation comes in a good range of colours but is a bit stark on the paler side, but I managed to find one after a lot a lot of swatching that matched my skin. It also really helps that this foundation adapts, and it really really does. It completely sinks into the skin as it is so thin and liquidy, if that makes sense, and does so really fast (although this means you have to blend it super-quick) matching the texture of skin perfectly so that you can hardly tell it's there. But the biggie that makes it stand out for me is the coverage. With the rise of the BB and CC and all the ABC's we've all become accustomed to skin-like products, but this one managed medium coverage too. Once builded, I admit it can begin to look cakey so not good for heavier coverage by layering, but for day to day this-is-my-own-skin skin it's perfect. Plus it lasts, so not much need for re-applying!

The concealer is also nice, but not so impressive. As you can see it's really yellow compared to its matching foundation, which means its good for tackling eye-bags, but it's thin so not so good for blemishes. A nice buy, but not one I'm in rush to stock up on. 

The foundation is only £9.99 and concealer £6.99, plus Boots has a 3 for 2 going at the mo which means you can get another little something for free, or if you don't find your shade you could always pick up two (or a summer one for spring!).
I really recommend getting out and trying this for yourself as neither this review or pictures will do it justice. I can't comment on how close it is to luminous silk, but it's pretty darn fab!

Lots of Love,
Charlotte
xxx

Tuesday, 15 October 2013

The Starting Off Project Week 8: Eyeshadow


Ooooh it's eyeshadow week. This is one I've been looking forward to for agessss, but now I've come to it, I'm actually  not too sure what to write. I've been playing around and experimenting with eyeshadow for years, and unlike products for the complexion I think eyeshadow is a part of makeup that is really personal to you - you know what you like and what suits you after a while. So many times has someone else done my eyes and had me running for a makeup wipe! So really my biggest tip is try, but here's also a few more tips and tricks I can share from my own relationship with eyeshadow....


There are two types (I couldn't think of any more) - cream (above), and powder (below). Creams really aren't as daunting as they look, and for beginners I think they're actually quite fab, just a little on your finger blended into the lid can be a very simple way of working eyes into your makeup routine. Secondly good ol' powder- better for creating more complex smoky eyes if you're feeling daring. Although I'm no argueee of the 'high end is better than drugstore' debate, I sit firmly on the side of the drugstore, be careful when buying cheap powders and always swatch first! If the pigmentation is rubbish, I would tend to stay away, as no matter how gifted you are with that blendy brush it ain't gonna look great. For cheap and really good quality colours, and a wide wide range, look towards Bourjois -their little pots have never let me down!


I would also say stick neutral! Although I like to pop out a blue or purple eye once in a blue moon, stick with nice neutrals like the ones in the pictures to make this easy for yourself. Unless you're a makeup fiend like me there's no need to purchase a naked palette (or all three, oops), but a nice matte light beigey shade for the lid area and a brown one for the crease and you have all you need for a range of looks, pick up a black and youve get everything to create a sultry, sexy, smokey look.

In terms of brushes, there's really only two you need, and although I love my Mac 217, a flat brush like this green forever 21 one (right) and a big fluffy blender like this Real Techniques one (left) will be absolutely fine! I still reach for these almost daily even alongside my more expensive ones. On the topic of blending, here is perhaps the most important tip - BLEND! Never leave a line around the end and never colour right up to eyebrows (I'm saying never as I never could although you might suit this look, I really don't), just make sure to blend it all in so you don't end up feeling like a clown!


And just experiment beauties! My eye looks change all the time!
Lots of Love,


Tuesday, 8 October 2013

The Starting Off Project Week 7: Eyeliner!


Good evening beauties, hope you've all had a great start to the week! This week on #thesoproject, we're talking eyeliner, and for this one I thought I'd give a little run-down of the different types of eyeliner and how to use them as unless you are an avid eyeliner lover like me, you've probably got one type that you stick to. Lets begin!...


The Liquid
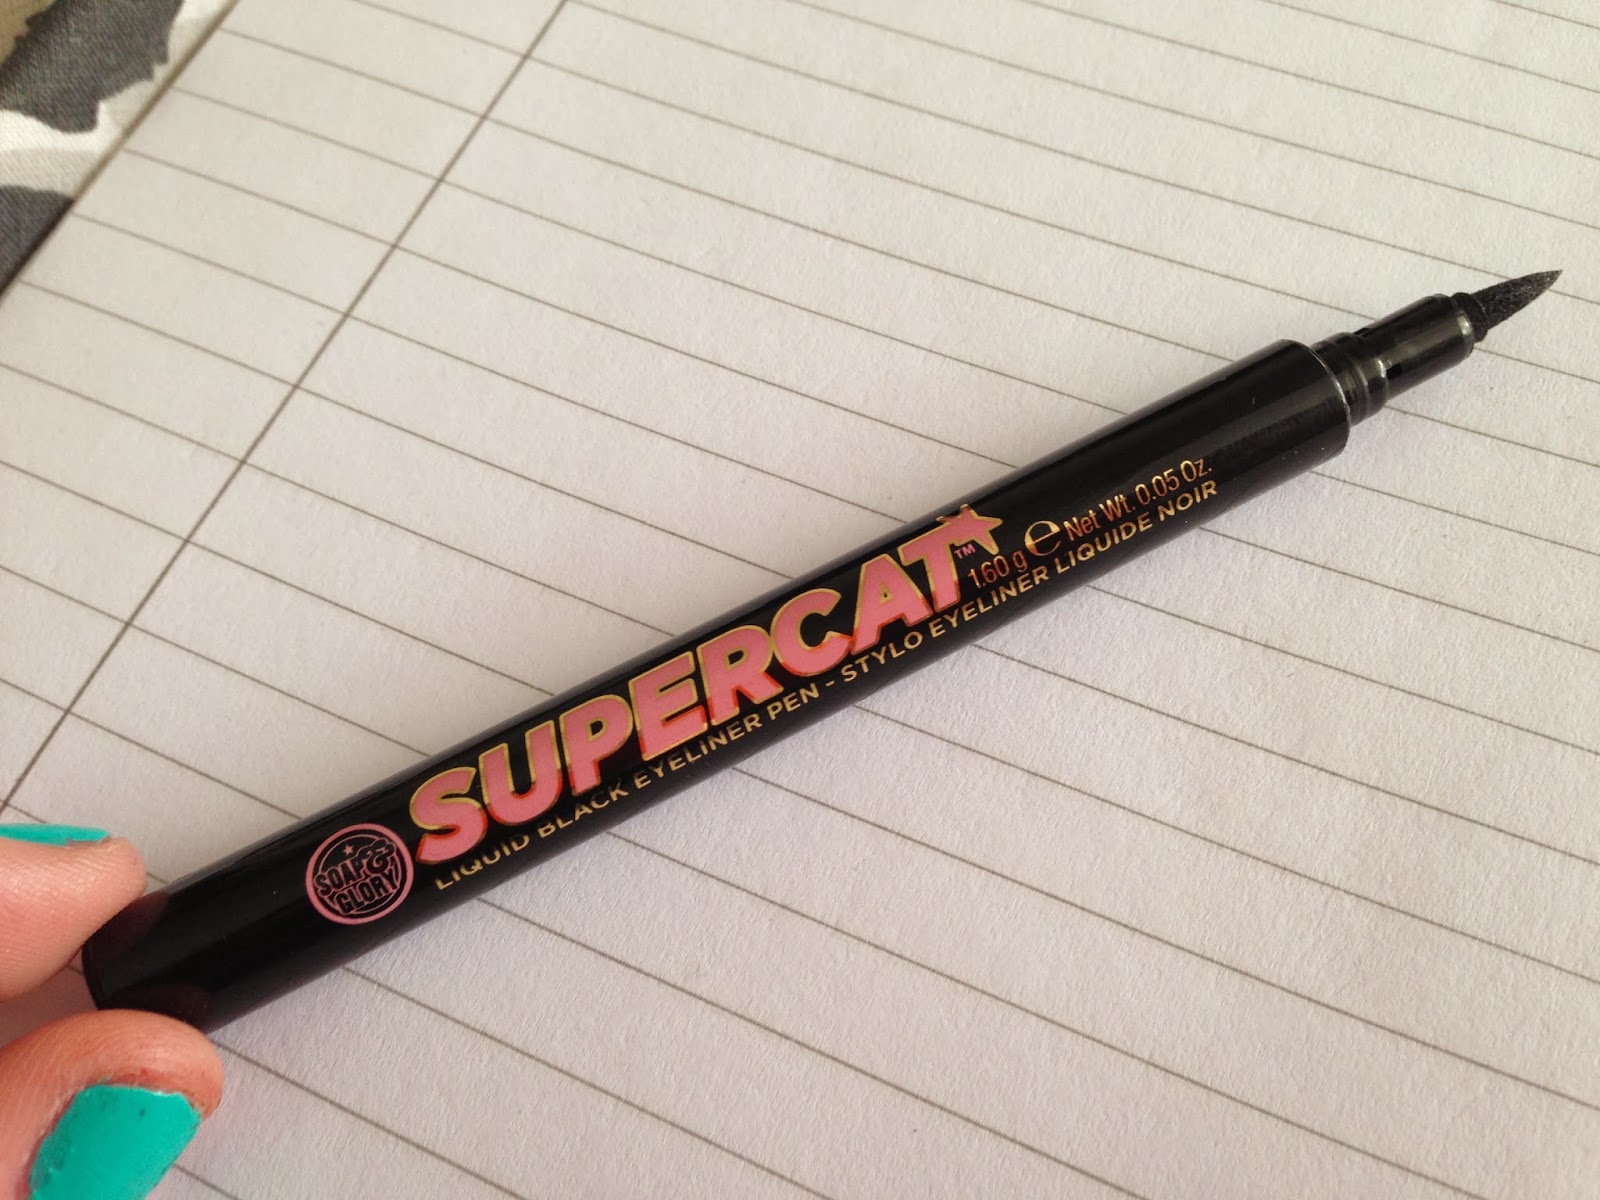
Liquid eyeliner I always think is something people love, but have difficulty using as it can get pretty messy! Instead of the traditional ones with a pen you dip into a pot, I go for the pen varieties (such as this Soap and Glory one) as I find them much easier to work with. Liquid eyeliner should be used to create defined lines such as a feline flick or just a simple upper lash lining. Dotted in between lashes subtly can create a very natural but full eyelash look too. This one shouldn't really be used to try a create a smoky eye, although if you have achieved one with this let me know! Beginners I would definitely recommend you try a pen style liquid eyeliner, as it might not be as tricky as you would expect!


The Kohl
A classic and my personal favourite. The Kohl is the multi-tasker of the group. Use it in a similar way to the liquid to create defined lines or even go a bit adventurous (it is almost Halloween) but just keep it sharp to avoid smudginess. More importantly though, this baby will give you that smokey eye you've been dreaming of. A little smudged half way across the lower lashes is perfect for subtle day time glamour or can be really built up on the night for sultry, sexy, makeup. Mostly I stick to brown and black, although blues, khakis, greys and purples also look gorgeous without being too in-ya-face! Try these bargain Topshop ones at £4, or even just a 99p one from a beauty store works fab!


The Eyeshadow
Not what you expected? Well just like kohl a black eyeshadow can be perfect for a more sultry eye look. Used with a skinny brush like this one, or even your finger or a cotton bud, can really smoke up an eye look. This is especially useful if you want to experiment with colour, or be more subtle than drawing on a line of eyeliner. I like to use it on my upper lashes if I'm rocking a smoky eye as it blend into shadow better than eyeliner but still looks as dark! Any eyeshadow of your choice is fine, this one is by Bourjois.


The Gel
A relatively new addition to the eyeliner world, but one that I must say is not as scary as it may look. Performs similarly to the liquid eyeliner, but its more gelly forumla can be used to create dark dark dark smudginess too if you're quick. The thing I like best about gel is that once set, it will not budge! Used with an angled brush its super easy to create flicks too, trust me! There are lots out there on the market now, but one that I love and a lot of other blogger seem to is Maybelline's offering, which also comes with a handy brush!


That's my quick whos-who of eyeliners, so there's only one thing left to do lovelies.... get experimenting!
If you're part of #thesoproject please post your links in the comment box!
Love,


Thursday, 3 October 2013

Mac Riri Woo At Last


Finally! At last I managed to get my hands on Mac's Riri Woo Lipstick before it sold out! I got up at crazy o'clock to get to Harvey Nichols before it opened and was the first there (but not the only makeup-mad people there I must say). The whole range looked absolutely gorgeous but now I'm a student again and have to spend my money on boring things like food, urgh, I could only afford one lipstick. Some people were just asking for the whole range! I was so jealous. But, I did manage to get my mitts on this stunning matte lipstick after all this time. The retro matte look is right up my street, so I'm instantly loving this!
There are still some left online, so if you're reading now, get onto Mac here right now!! My other reccomendation would be Talk that Talk which looks so nice too, and the eyeshadow pallettes! 

I'll let the pictures do most of the talking (although I apologise my dark uni room and a rainy day means the lighting was absolutely rubbish), but I must say after swatching and trying on the way home this retro matte is just as super-pigmented as regular mac lippies, plus has that gorgeous scent that I just love! And if this doesn't sell it to you, have you seen the packaging? Its lush!! 
As a retro matte I can imagine with longer wear this could be drying, but a little balm pre-application solves this without taking away the matte finish!

Get shopping ladies!


Lots of Love,


Tuesday, 1 October 2013

The Starting Off Project Week 6: Mascara!


Hey beauties, can you believe it's week 6 of The Starting Off Project already?! I went on a little break last week as I had some major technical issues at home, plus I'm not a big blusher wearer, but this week I am definitely back with all things mascara related! Unlike blusher, mascara is something I could not live without. Seriously. The thought of leaving the house without it? Urgh. 

Because of my love of mascara I find myself testing and trying lots of different releases, and boy is there plenty. When isn't there a new formula or wand out that promises to give you bigger, fuller, longer, more beautiful lashes? And while I usually fall for hypes and try the new products, there are a few old favourites I always return to, and these are what I'm going to share.

First of all I want to also point out that I really believe that the wand, not the formula, makes a mascara, and so from time to time (and I know I'm not the only one) I've saved good wands from expensive mascaras and dipped them in the cheaper ones. Not as good results as using the original, but if you're on a budget like me, just a little tip!


 I picked my two regulars and all time favourites, the best being Maxfactor's False Lash Effect offering in the middle. I don't know how it does it, but I can't find anything that gives me better separation and volume like this baby does, and so consistently. However, I am a sort of two-mascara girl, I like to really lengthen and then bulk up with something volumising (you could volumise then lenghten but I just don't think it works the same). To lengthen I use No7's Extreme Length because it does exactly what it says on the tin! I've just realised I've photographed the same mascara twice here when in fact I was trying to get one of the purple waterproof version too. They are the same mascara, but just different packaging, although I personally find the waterproof (lets pretend it's the one on the right) performs slightly better in its longevity!

Here's a picture of the brushes below. I'm not sure how true this is, but I find the bulkier the brush, the more volume you get, so I look out for thinner brushes (on the edges) for length and bulkier ones (middle) for volume!

You'll notice that I've also included eyelash curlers in this weeks post, and that's because I never use mascara without them. Mine are Shu Uemura, but if you don't have £20 to splash out any old pair still make a huge difference. I like to pump at the bottom of lashes, right in the roots, for a few seconds, then do another shorter pump half way up, but fiddle with them to find the best results for you. The Voila! Super curly stand-out lashes will be yours!

Apart from my two favourites here, I also love the superbargainous mascara range from Natural Collection in Boots, and Maybelline's 'The Rocket Volume' for night out blackest-black lashes!

As always please send me your questions and comments or links in the comment box below, and have a brilliant week lovelies!


Friday, 27 September 2013

My Favourites: Urban Decay Primer Potion


It's time for another all time favourites post, yey!! Today it's a makeup post, and a product I use pretty much every single day - Urban Decay's Primer Potion in 'Sin'. I'm a firm believer that when it comes to eye products, with the exception of mascara, you can't beat Urban Decay for quality, pigmentation and longevity. And one of the products that ensures this longevity, and a crease free eyeshadow look all day is this primer. I used to buy this solely in the original colour free shade, which I love to, but when new colours were released I switched to sin as I love the finish on it's own and wear it as a shadow too. 
You need the tiniest tiniest amount of product to cover each eye and keep eyeshadow in place, so one of these tubes will probably last you around a year if you use it every day and for £15, that's really not bad. I've pictured the shimmering 'sin' shade here, but the original or 'Eden' shade are perfect for keeping concealer in place to hide those blemishes all day too!
To make this even more of a holy grail product, applying one of these primers before eyeshadows seems to make them even more pigmented, so even if you're not looking to extend the life of your eye makeup this is a winner for making your eyeshadow look impressively high-end. If I had one niggle, and it really is a niggle, is that (as you can see) the words on the packaging do rub off slightly, but really, is this a real problem? 


(Easily two eyes worth applied onto the hand...)

(...And then rubbed in)

As you can see 'Sin' is a nice pinky rose gold colour, but there's also the clear 'Original' on offer, a fleshy toned 'Eden' and golden shimmery 'Greed', so you can pick which suits you, but look out for free sample offers at your local counter as travel-size primer potions are always being given away with purchases. 

This is one of those products that while I'd love to try a different eye primer, I always end up coming back to Urban Decay and getting another one of these, and when I do pluck up the courage to try something new I'm always left dissapointed and going back to my old eye hero. If you was to try one new primer, eye product, or high end splurge this month, make it this, but I warn you, you'll be hooked!

As always I'd love to hear your comments and questions, I reply to them all!
Lot of love,


Saturday, 21 September 2013

#supergorgeoussept day 20: sparkle!


Ahhh how pretty is this picture! I love sparkle, so this wasn't the easiest day to pick a picture with the theme sparkle for my 30 day instagram challenge (check it out on here or instagram), but as I was busy packing I came across my beloved glitter eyeliners and little pots which I usually use over eye shadow. These make it out for christmas most years then dissapear for the rest of the year or until a suitable fancy dress occasion. But as the party season fast approaches ( kind of ) I thought why not discuss some of my favourites.
The glitter pots I have no idea where I got them, I think a few were presents and just others I have collected, but the pens I bought myself.

The Urban Decay Heavy Metal was actually a repurchases as I love it that much, it's a gorgeous bronze colour which makes it quite wearable but also its such high quality. No stickiness or blobbiness, it's a slightly thinner formula as you can see but this means it doesn't stick your eyelids together or form lines as it dries fast!

The other three came in a christmas set from 17 last year I think, so look out for them in Boots soon! There's a silver, gold, and my favourite turquoise. I must admit I dont get half as much wear out of these as I did as a seven year old whose makeup consisted of just glitters and wierd tinted lipsticks, but they're fab for glam nights out! The 17 offerings aren't as good quality as those from Urban Decay, but are still worthwhile and must cheaper! I find the 17 ones easier for building up coverage if you're going for full on glitter, and both are fab for a glittery liner!

Both appear in sets around Christmas time so I imagine they'll be popping up in stores in the next month. And if glitter isn't your thing, you can still enjoy todays picture. Ahhh glitter!

(L-R) Urban Decay in Baked, 17 Glitters, Silver, Turquoise, Gold.
Apologies for the out-of-focus picture but I was trying to capture the sparkliness!

Tuesday, 17 September 2013

The Starting Off Project Week 4: Bronzer


Hello beauties, can you believe it's been four weeks already?! This week we're chatting bronzer, something I love as I can't get enough of a healthy glow and nice fake tan. (not to say I haven't gone tangooed many, many times in the past). 
First things first, I thought we would address contouring, as it seems to be a big question amongst you all when it comes to bronzer- what is it? how do i do it? what do i use?

In a nutshell contouring is the art of changing your face shape (I love how Charlotte Tilbury calls it facial architecture) through creating shadow with bronzer. Mostly applied to cheeks, once you get to grips with it you can contour your nose and forehead too, but for now lets stick to the cheeks. You don't need any special products although there are some out there, mostly high-end, but a bronzer that isnt too orange and NOT shimmering will do. The easiest way to create the illusion of killer cheekbones is to suck them in and sweep a small, I repeat small, amount of product in the hollow, to look like a shadow. I realise without being shown how to contour this could be difficult to imagine, so I'd recommend checking out some contouring tutorials on youtube, there's loadsssss, and Lisa Eldridges are a particular favourite of mine (have a watch here). I might do a more specific contour post soon, let me know what you think!

On to products....

So obviously as well as contouring bronzer is used to well, bronze, and add a bit of life to the skin. Unlike my usual array of products I'm pretty loyal when it comes to bronzer and stick to my Benefit Hoola (not the cheapest, but last ages), but over the summer I've also loved this Bourjois Bronzing Primer underneath foundation to create an all over subtle glow. PS. this is amazing as a cream bronzer but not the easiest to use, so any beauty pro's out there, this is fab, and please show me how to do it properly!


( A little look inside, and boo I've hit pan!)

Application- 
Surprise, surprise, I've picked Real Techniques brushes for this one. I'm so darn predictable.
Which brush you use really depends on what look your going for. If you want an all over generally browner face while dodging that dodgy foundation-darker-than-skin look the hugeeee Powder Brush is for you- simply dip in, tap of excess and sweep all over. For more specific bronzing of cheeks and forehead I choose the smaller Buffing Brush (such a multitasker) and for contouring, the good old Contouring Brush (I posted here about contour brushes too). You can find these online or in Boots and Superdrug, and theyr'e also dead cheap on Amazon.


(L-R, Powder Brush, Buffing Brush, Contour Brush).


And that's it for this week folks. Not as much to say as usual as I'm pretty straight forward to bronzer, and I really do recommend checking out videos as it's much better to see it applied. And also, a little word of colour, don't go for anything too shimmery or too orange. Do use bronzer if you have used fake tan, do go careful on the instant tan if it's raining, don't go for the darkest shade you can see, and do blend bronzer down your neck to avoid an orange head. And finally on the topic of all round bronzing - don't apply your St Tropez Instant Mousse and Bronzer if you've already had one too many gin-slings, or you will end up looking what is now know amongst my friends as 'Newcastle Orange'...


Lots of love beauties, 


#supergorgeoussept day 17 : favourite drugstore product


Favourite drugstore product. This was a really, really, really hard one. I can't put my hand on my heart and promise this is my drugstore favourite, because to be quite honest I could never choose one. But I did have a rummage in my daily makeup box and choose my favourite drugstore product of the minute from there. You've probably heard me mention this before as I absolutely love it! 

Designed to adapt to your skin tone, it actually does change and seem to melt into the skin, giving you that 'my skin is perfect without makeup' look we all desire! Obviously you have to still match your colour, don't pick up 'Golden' if you're a pale faced beauty! I went for 'Natural', which I'm guessing from the name and experience will suit most light-medium skin tones, and once applied it really does adapt! I find this particularly useful in these transitional months as my skin loses any scrap of tan or colour I managed to achieve over summer, and with a medium-builable coverage it's perfect as my skin likes to play up when the weather changes (seriously, chin, stop it with the spots already!). Plus it has less of a yellowy tone than most, meaning it will probably merge with your skin better in the colder months, while its peachiness counteracts any dullness you might experience.

I'd seriously reccomend you trying this out no matter what your skin type too, its a liquid with a sort of dry, mousse-y texture than kind of melts on the skin, leaving a matte finish, which personally I also look for as the sun goes in and I lust after a less glowy finish. I have combination skin, but with this I get an even and equal finish on both my dry cheeks and oily forehead. Could I rave about it any more? Yupp, because the price is fab at around £9.99 depending on where you pick it up, but always look out for offers (Boots have a buy one get one half price on at the minute).

You can probably tell I really like this, and this is why I've chosen it as ONE of my drugstore favourites. There will never be a day I pick one, but at least I tried, eh?

Lots of love,


Design by | SweetElectric